


Aprilaire 600 Manual Wiring: A Comprehensive Guide
This guide details the Aprilaire 600 humidifier wiring process, covering standard and advanced installations. It references crucial diagrams and safety precautions for optimal performance and troubleshooting.
Understanding the wiring is key, especially regarding the solenoid valve, humidistat, and furnace board connections. Proper installation ensures efficient humidity control.
Always consult the installation manual for specific diagrams and follow safety guidelines to prevent component failure or system malfunction during the wiring process.
The Aprilaire 600 humidifier is a whole-house system designed to add moisture to your home’s air, combating the dryness common during heating seasons. This model, along with the 600M variant, offers improved comfort and protects wood furnishings from cracking and warping; Understanding its functionality begins with recognizing its core components and how they interact.
This humidifier operates by utilizing a water panel that evaporates moisture into the airflow of your furnace. The system is controlled by a humidistat, which monitors humidity levels and signals the solenoid valve to open or close, regulating water flow. Proper wiring is paramount for safe and effective operation.
Installation can be performed on either the supply or return plenum, depending on your furnace configuration. The Aprilaire 600 is compatible with various furnace setups, including downflow systems, but requires careful attention to wiring specifics. This guide will navigate you through the process, ensuring a successful installation and years of comfortable, healthy indoor air.
Understanding the Aprilaire 600 Model Variations (600 & 600M)
While functionally similar, the Aprilaire 600 and 600M models possess key distinctions impacting wiring considerations. Both are designed for whole-house humidification, integrating with your existing furnace system to deliver consistent humidity control. However, the 600M typically includes a built-in motorized damper, automating airflow control through the humidifier.
The presence of this damper in the 600M simplifies some wiring aspects, eliminating the need for separate damper control wiring. Conversely, the standard 600 model may require additional wiring for manual damper operation. Regardless of the model, both require a 24-volt power source from the furnace control board.
Careful identification of your specific model is crucial before commencing any wiring work. Refer to the unit’s label or original documentation to confirm whether you have the 600 or 600M. This ensures you follow the correct wiring diagrams and avoid potential compatibility issues during installation.
Safety Precautions Before Wiring
Prioritizing safety is paramount when wiring your Aprilaire 600 humidifier. Always disconnect power to your furnace at the breaker box before beginning any electrical work. This prevents accidental shock and potential damage to the system. Verify the power is off using a non-contact voltage tester.
Never connect the humidifier transformer to the blower motor wiring, as this can lead to premature component failure. Ensure all wiring connections are secure and properly insulated to avoid short circuits. Use appropriately sized wire connectors and follow local electrical codes.
If you are uncomfortable working with electrical wiring, consult a qualified HVAC technician. Improper wiring can create a fire hazard or damage your furnace and humidifier. Read and understand the installation manual thoroughly before starting, paying close attention to all safety warnings and instructions.

Wiring Fundamentals
Successful Aprilaire 600 wiring relies on understanding voltage requirements, identifying key components like the solenoid and humidistat, and locating accurate wiring diagrams.
A 24VAC power source from the furnace board is essential for operation, powering both the control and valve effectively.
Voltage Requirements & Transformer Considerations
The Aprilaire 600 humidifier operates on a 24VAC (Volts Alternating Current) power supply, typically sourced directly from the furnace control board. It’s crucial not to connect the humidifier’s transformer to the blower motor wiring, as this can lead to premature component failure and void the warranty. Utilizing the furnace’s existing 24VAC is the standard and recommended method.
If a dedicated transformer is absolutely necessary – perhaps due to furnace compatibility issues or a lack of available 24VAC – ensure it’s appropriately sized to handle the combined load of the humidistat and solenoid valve. A transformer with a VA (Volt-Ampere) rating of at least 20VA is generally recommended.
Carefully check the furnace board’s labeling to identify the R (power) and C (common) terminals. These are the connection points for the 24VAC supply. Incorrect voltage or polarity can damage the humidifier control. Always verify the voltage with a multimeter before connecting any wires. Proper transformer selection and wiring are vital for reliable operation and longevity of the Aprilaire 600 system.
Identifying Key Components: Solenoid Valve, Humidistat, Furnace Board
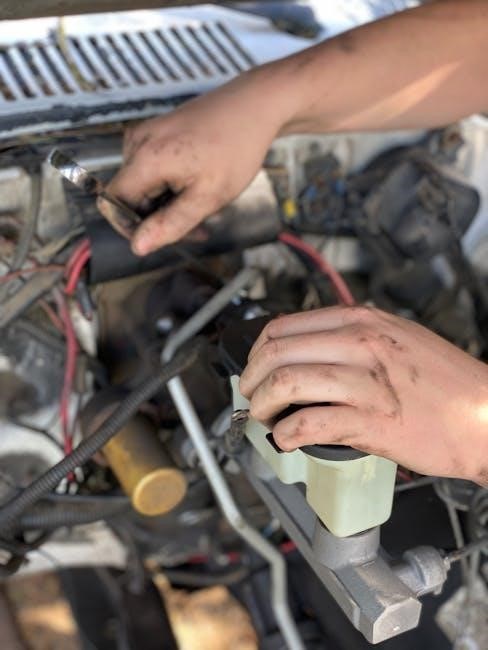
The Solenoid Valve controls the water flow to the evaporator pad. Locate it within the humidifier unit, typically connected to the water supply line. It’s an electrically operated valve, activated by the humidistat signal.
The Humidistat is the control center, sensing the humidity levels in your home. It’s usually wall-mounted and allows you to set your desired humidity level. It sends a signal to the solenoid valve when humidity drops below the setpoint.
The Furnace Board provides the 24VAC power necessary for the humidifier’s operation. Identify the R (power) and C (common) terminals on the board – these are the connection points for the humidifier wiring.
Understanding the function and location of each component is crucial for successful wiring. Correctly identifying these elements ensures proper communication and operation of the entire humidification system. Refer to the Aprilaire installation manual for detailed diagrams and component illustrations.
Wiring Diagrams Overview: Where to Find Them
Accurate wiring diagrams are essential for a successful Aprilaire 600 installation. The primary source is the installation manual included with your humidifier. Locate the section specifically detailing the wiring schematics for your model (600 or 600M).
Aprilaire’s official website (aprilaire.com) offers downloadable manuals and resources. Search for your model number to access digital copies of the wiring diagrams. These diagrams illustrate the connections between the solenoid valve, humidistat, and furnace board.
Online forums and communities dedicated to HVAC systems often feature user-shared diagrams and troubleshooting advice. However, always verify information from these sources against the official Aprilaire documentation.
Pay close attention to the diagram’s labeling, identifying the R, C, and humidistat terminals. Understanding the diagram’s symbols and notations is vital for correct wiring. Always disconnect power before working with electrical connections.
Wiring Instructions ౼ Standard Installation
Standard installation involves connecting the humidifier to the furnace board’s R and C terminals, linking the humidistat, and properly wiring the solenoid valve for operation.
Ensure power is off before beginning, and carefully follow the wiring diagram for your specific Aprilaire 600 model.
Wiring to the Furnace Board (R and C Terminals)
Connecting the Aprilaire 600 to the furnace board’s R and C terminals provides the necessary 24VAC power. Crucially, do not connect the humidifier transformer to the blower motor wiring, as this can lead to premature component failure. Locate the R (power) and C (common) terminals on your furnace control board – these are typically labeled.
Carefully connect the wires from the humidifier control to these terminals, ensuring a secure connection. Many installations utilize a wire nut for this purpose. It’s vital to verify the voltage at these terminals with a multimeter to confirm a stable 24VAC supply.
Incorrect wiring can damage both the humidifier and the furnace. If you are unsure about identifying the correct terminals, consult a qualified HVAC technician. Some furnace boards may require a jumper wire between certain terminals; refer to your furnace’s documentation for specifics. Always double-check your connections before restoring power.
Remember to disconnect power before any wiring work!
Connecting the Humidistat
The humidistat acts as the control center, signaling the humidifier to activate or deactivate based on humidity levels. Typically, the humidistat connects to the furnace board and the solenoid valve. Locate the terminals on the humidistat designated for connection – these are usually labeled clearly.
Wiring involves running a low-voltage wire from the humidistat to the furnace board, connecting to the designated humidistat terminal. Another wire runs from the humidistat to the solenoid valve, completing the circuit. Ensure all connections are secure and properly insulated.
Proper humidistat placement is crucial for accurate readings; avoid direct sunlight or drafts. After wiring, test the humidistat’s functionality by adjusting the setpoint and verifying the solenoid valve responds accordingly. If the humidistat isn’t responding, double-check the wiring and voltage supply.
Always refer to the specific wiring diagram for your model!
Solenoid Valve Wiring Details
The solenoid valve controls the water flow to the humidifier, opening and closing based on signals from the humidistat. Typically, it receives 24VAC power from either the furnace board or, in some setups, directly from the humidistat. Locate the valve’s terminals – usually two for power connection.
Wiring involves connecting a wire from the humidistat (or furnace board) to one solenoid valve terminal, and another wire to complete the circuit. Ensure the wiring is secure and protected from water exposure. Incorrect wiring can lead to valve malfunction or water damage.
Verify the solenoid valve receives the correct voltage using a multimeter. If the valve doesn’t open or close when the humidistat calls for humidity, check the wiring connections and voltage supply. A faulty solenoid valve may require replacement.
Do not connect the Model 600 transformer to the blower motor wiring!
Advanced Wiring Scenarios
Beyond standard setups, wiring can become complex with fresh air ventilation controls, downflow furnaces, or compatibility with older humidifier series like 400, 500, and 700.
These scenarios require careful diagram interpretation and potentially adapting wiring configurations for proper functionality and system integration.
Wiring with a Fresh Air Ventilation Control (FAVC)
Integrating a Fresh Air Ventilation Control (FAVC) with your Aprilaire 600 humidifier introduces an additional layer to the wiring process, enhancing indoor air quality by managing fresh air intake. This setup typically involves connecting the FAVC to both the furnace control board and the Aprilaire humidifier control.
The FAVC wiring diagram is crucial; it dictates how the control interacts with the humidifier’s solenoid valve. Generally, the FAVC provides a signal to either activate or deactivate the humidifier based on fresh air damper position and humidity levels. This often involves utilizing a relay within the FAVC to switch the 24VAC power to the humidifier’s control.
Carefully identify the FAVC’s output terminals designated for humidifier control. These terminals will connect to the appropriate input on the Aprilaire 600’s humidistat or control board. Ensure proper polarity and secure connections. Incorrect wiring can lead to the humidifier operating erratically or not at all. Refer to both the FAVC and Aprilaire installation manuals for specific wiring instructions tailored to your models.
Double-check all connections before powering on the system to avoid potential damage to the components. A properly wired FAVC and Aprilaire 600 combination provides optimized humidity control alongside improved ventilation.
Downflow Furnace Installation Wiring
Wiring an Aprilaire 600 humidifier to a downflow furnace requires specific considerations due to the reversed airflow direction. Unlike traditional upflow systems, access to the furnace board and plenum can be more challenging, necessitating careful planning and execution.
The primary difference lies in the physical routing of wires; The humidifier’s water supply line and control wiring must be run above the furnace, rather than below. Ensure sufficient clearance to prevent interference with the blower motor or other components.
Pay close attention to the R and C terminal connections on the furnace board. As with any installation, verify the transformer is not connected to the blower motor wiring to avoid premature failure. The humidistat wiring remains largely the same, but the physical placement of the humidistat may need adjustment for optimal sensing.
Always consult the Aprilaire installation manual for downflow-specific diagrams and instructions. Carefully secure all wiring to prevent it from being dislodged by airflow or maintenance activities. A secure and properly wired installation ensures reliable operation in a downflow configuration.
Wiring for Model 400, 500, and 700 Series Compatibility
The Aprilaire Model 600 humidifier control is designed with compatibility in mind, functioning effectively with older Aprilaire humidifier models – specifically the 400, 500, and 700 series. However, understanding the wiring nuances is crucial for a seamless transition.
Generally, the wiring scheme remains consistent; the R and C terminals connect to the furnace board’s 24VAC power, powering both the humidistat and solenoid valve. The humidistat wiring also follows a similar pattern, controlling the valve’s operation based on humidity levels.
The key consideration is ensuring the existing wiring is in good condition and properly sized for the new control. Inspect connections for corrosion or damage, and replace any questionable wiring.
Refer to the Bel-Aire ElectronicAirCleaners.com resources for specific diagrams illustrating the compatibility. Always prioritize safety and disconnect power before making any wiring changes. Proper adaptation ensures continued humidity control functionality with your existing Aprilaire humidifier system.
Troubleshooting Wiring Issues
Common problems include no power, constant operation, or a non-responsive humidistat. Verify wiring connections, check the transformer, and reset the control for resolution.
Carefully review diagrams and ensure proper voltage reaches all components for effective troubleshooting.
No Power to the Humidifier
If the Aprilaire 600 humidifier receives no power, systematically check several key areas. First, verify the furnace board is supplying 24VAC to the ‘R’ and ‘C’ terminals, as this is the primary power source. Use a multimeter to confirm voltage presence.
Next, inspect the transformer. Ensure it’s correctly wired and functioning; a faulty transformer will prevent power delivery. Do not connect the Model 600 transformer to the blower motor wiring, as this can cause premature failure.
Examine the humidistat wiring. A loose connection or a malfunctioning humidistat can interrupt the power flow. Bypass the humidistat temporarily (following safety precautions) to see if the humidifier powers on. Check all wire connections for tightness and corrosion.
Finally, review the installation manual’s wiring diagrams to ensure everything is connected according to the manufacturer’s specifications. A miswired component can easily cause a complete power failure.
Remember safety first – disconnect power before inspecting wiring!
Humidifier Runs Constantly
If your Aprilaire 600 humidifier operates continuously, the most common cause is a faulty or improperly adjusted humidistat. Verify the humidistat’s setpoint is not set too high, causing it to constantly call for humidity. Test the humidistat’s functionality by manually adjusting it and observing if the humidifier responds.
Inspect the humidistat wiring for shorts or loose connections. A short circuit can trick the system into believing the humidity level is always low. Check for water damage near the humidistat, which could cause malfunctions.
Examine the solenoid valve. A stuck-open solenoid valve will allow water to flow continuously, even when the humidifier isn’t needed. Ensure proper wiring to the solenoid valve, referencing the installation manual’s diagrams.
Consider a malfunctioning furnace board, though less common. A faulty board might send a constant signal to the humidifier. Review all wiring connections for accuracy and tightness.
Always disconnect power before troubleshooting wiring!
Humidistat Not Responding
A non-responsive humidistat indicates a break in the control circuit. First, verify the humidistat has power. Check the voltage at the humidistat terminals with a multimeter, ensuring it receives the 24VAC from the furnace board (R and C terminals).
Inspect the wiring connections at both the humidistat and the furnace board. Look for loose wires, corrosion, or damaged insulation. Ensure wires are securely fastened to the terminals.
Test the humidistat itself. If possible, bypass the humidistat temporarily to see if the humidifier operates. If it does, the humidistat is likely faulty and needs replacement.
Check the furnace board’s output to the humidistat. A malfunctioning board may not be sending the necessary signal. Consult the furnace board’s manual for troubleshooting steps.
Remember to disconnect power before any wiring inspection or testing!
Maintenance & Resetting
Regular maintenance ensures optimal humidifier performance. Resetting the control to its original position can resolve operational issues. Follow the manual’s instructions for proper procedures.
Sudden operation may cause personal injury; caution is advised during maintenance and resetting procedures.
Humidifier Control Reset Procedure
Resetting the Aprilaire 600 humidifier control is a straightforward process, often necessary after maintenance, power outages, or if the system malfunctions. Begin by locating the reset button on the humidifier control unit itself. This button is typically small and recessed, often requiring a pen or similar tool to depress it.
Before initiating the reset, ensure the furnace power switch is turned OFF. This is a crucial safety precaution to prevent electrical shock or damage to the system. Once the power is off, press and hold the reset button for approximately three to five seconds. You may hear a slight click indicating the reset has been initiated.
After releasing the reset button, restore power to the furnace. The humidifier control should now return to its default settings. Verify proper operation by checking the humidistat and observing if the humidifier responds to humidity level adjustments. If the issue persists, consult the full installation manual or contact Aprilaire support for further assistance. Remember to always prioritize safety when working with electrical components.
Regular Maintenance for Optimal Performance
Consistent maintenance is vital for ensuring the Aprilaire 600 humidifier operates efficiently and reliably. Annual inspection of the solenoid valve is recommended, checking for mineral buildup or corrosion that could impede water flow. Flush the humidifier annually to remove sediment and scale, preventing clogging and maintaining optimal humidity output.
Inspect the water panel for signs of wear and tear, replacing it as needed to maintain proper evaporation. Check all wiring connections, ensuring they are secure and free from corrosion. Loose connections can cause intermittent operation or complete failure. Clean the humidistat regularly to ensure accurate humidity readings.
Sudden operation can cause personal injury, so always disconnect power before performing maintenance. Following these simple steps will extend the lifespan of your Aprilaire 600 and guarantee consistent, comfortable humidity levels throughout your home. Refer to the installation manual for detailed maintenance schedules and specific component cleaning instructions.
Additional Resources
Access the full installation manual online for detailed diagrams and troubleshooting. Aprilaire support is available via phone or their website for assistance. Dimensional diagrams for the Model 600 are also accessible.
Accessing the Installation Manual
Locating the official Aprilaire 600 installation manual is crucial for successful wiring and maintenance. The manual provides detailed wiring diagrams, component identification, and troubleshooting steps specific to your model – either the 600 or 600M.
You can typically find a digital copy of the manual on the Aprilaire website (aprilaire.com) within their support or documentation section. Search for “Aprilaire 600 Installation Manual” or “Aprilaire 600M Installation Manual” to pinpoint the correct document.
Alternatively, many HVAC supply websites that sell the Aprilaire 600 also offer downloadable manuals. Ensure the manual version matches your humidifier’s manufacturing date for accuracy.
The manual outlines essential safety precautions, voltage requirements, and specific instructions for various wiring scenarios, including downflow furnace installations and compatibility with other systems like Fresh Air Ventilation Controls (FAVC). Always refer to the manual before attempting any wiring work to avoid damage or safety hazards.
Aprilaire Support & Contact Information
For direct assistance with Aprilaire 600 wiring or any related issues, contacting Aprilaire’s support team is highly recommended. They offer expert guidance and can clarify complex wiring diagrams or troubleshooting steps.
You can reach Aprilaire Customer Support through several channels: their official website (aprilaire;com) features a comprehensive FAQ section and a contact form for submitting inquiries.
Alternatively, you can call their customer service hotline at 1-800-334-6011. Be prepared to provide your humidifier’s model number (600 or 600M) and any relevant details about your wiring setup.
Additionally, many HVAC professionals are certified to install and service Aprilaire products. Locating a qualified technician in your area can provide hands-on assistance and ensure proper wiring according to local codes. Remember to always prioritize safety and consult with a professional if you’re unsure about any aspect of the wiring process.
Understanding Dimensional Diagrams (Model 600)
While primarily focused on wiring, understanding the physical dimensions of the Aprilaire 600 is crucial for proper installation and ensuring adequate space within your HVAC system. Dimensional diagrams illustrate the unit’s footprint, height, and inlet/outlet locations.
These diagrams, found in the installation manual, are essential for verifying compatibility with your furnace and ductwork. They help determine if there’s sufficient clearance for wiring connections and maintenance access.
Pay close attention to the dimensions related to the solenoid valve and humidistat mounting points, as these directly impact wiring routes. Incorrect placement can strain wires and potentially cause connection issues.
The diagrams also depict the water supply connection points, which are relevant if you’re modifying existing plumbing. Accurate measurements prevent interference with other components and ensure a secure, long-lasting installation. Refer to Figure 6 in available resources for a visual representation.
Leave a Reply
You must be logged in to post a comment.